Friday, December 19, 2014

Painting on Developer

1:48 PM Posted by Eva
Idea

I really want to try painting developer for my idea project. I had never heard of this technique before today, but I think it looks amazing, and there's so much that you can do with it. I looked through some articles and learned some tips and techniques.

http://www.ephotozine.com/article/uneven-development---darkoom-guide-4729

Tools to try: straws, sponges, scrubbing brush, water gun, paintbrushes

Techniques: blowing the developer around with a straw, sponging it on, gently applying it with a scrubbing brush, spraying it on for a paint splatter effect, loading it into a calligraphy pen, painting designs or pouring it on above to create a pooling effect.

Tips: make sure you allow enough time for the picture to properly develop, test out your materials ahead of time, make sure you know where everything is in the photo before you expose it, stay near a safelight so you can see where you are spreading the developer and make sure you don't apply too much/miss any spots

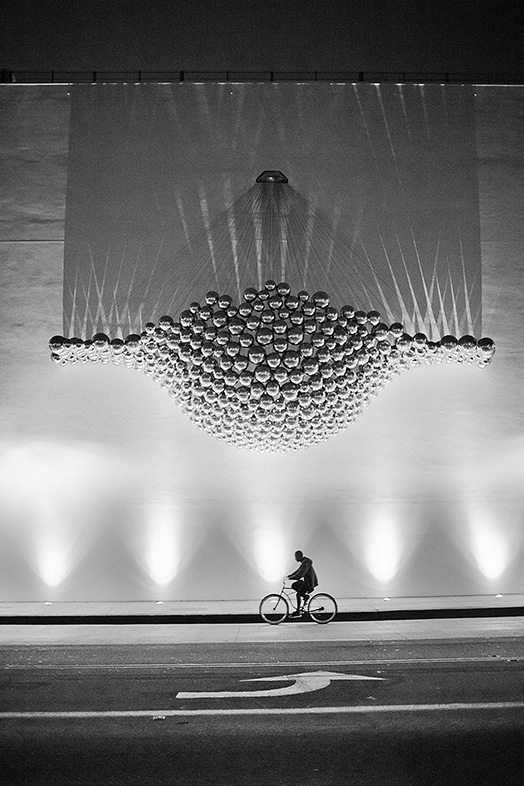
Splatter Effect (with a spray gun)
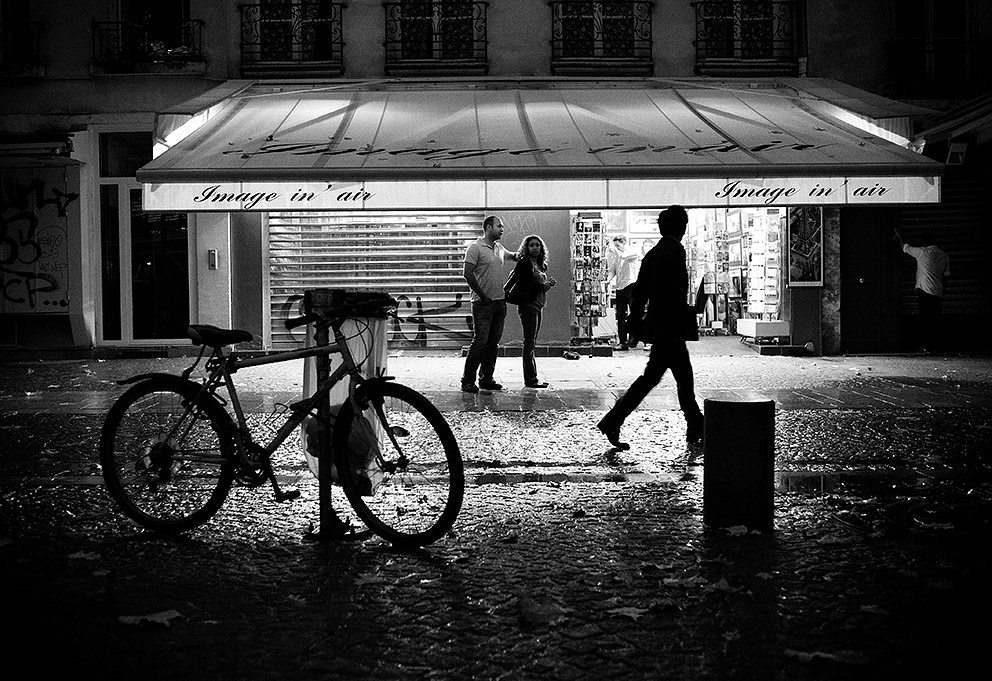
Scrubbing Brush


Friday, December 12, 2014

1:54 PM Posted by Eva
Inspiration

After talking to Ms. Murphy from Hallmark, I looked through their catalogue and their pictures online and I found them really inspiring. I love the composition  in a lot of the pictures, and the focus, and I found them very impressive. I also looked up her friend Katy Merry, and her pictures are beautiful.

I think this picture is gorgeous because it is lit perfectly, the depth of field showcases the bride's mehndi and it makes me think of all of the Indian weddings that I have been to and how fun they can be. I also like that you can't see her face, and it isn't a traditional portrait of the bride. Also choosing to make the picture black and white takes away any distractions because saris that brides wear tend to be very bright and the bangles do as well. On top of the rich colour of the mehndi, the rings wouldn't have stood out, but in black and white, they contrast and are the focal point.

http://www.ktmerry.com/portfolio.cfm?galleryID=5

Friday, December 5, 2014

9:16 PM Posted by Eva
Idea

For the memories project, I am planning on taking most of my pictures inside, but there won't be a lot of natural light. I thought a solution to this would be to try some double exposures, because not only would it be perfect for this project, but the film would get properly exposed since it will get exposed twice.

http://www.squarefrog.co.uk/techniques/multiple-exposures.html

This website shows some tips for how to get a good double exposure from a Holga camera. It recommends shooting in lowlight which is perfect. I also found this Flickr which is for a Project called a Tale of Two Cities. Basically, one person shoots a roll of film, rewinds it and then sends it to another photographer without disclosing what they took pictures of. Then the second photographer shoots the roll and develops it, and it ends up with a full roll of double exposures. I really liked this idea and how it was a surprise for each photography.

https://www.flickr.com/groups/urbandoubleexposed/pool/

Saturday, November 29, 2014

11:07 AM Posted by Eva
Inspiration

https://encrypted-tbn1.gstatic.com/images?q=tbn:ANd9GcR3xrJhFwQiQ_XMys3y360fH3ddX0wCFy48bblYC242_GMa7x9clw

I like this picture a lot because only the swing is in focus, and it shows a different perspective on the swing. When we were children, swings were bright and colourful and very fun, but in this picture, it looks dark and gloomy. I like how it shows a new perspective on something that we had seen very differently as children. I think I might try this for my memories project - showing things I had loved in a new light.

Friday, November 14, 2014

10:56 PM Posted by Eva
Idea

https://c2.staticflickr.com/8/7037/6807416070_b7b686e313_z.jpg

I have already begun to take my pictures for this project, and I took most of them at a playground during the ay. These pictures at night however make it look ominous and scary. You can barely make out the bright colours that typically add to its innocence, and instead you can see the looming, threatening shadows.

https://encrypted-tbn2.gstatic.com/images?q=tbn:ANd9GcSHizajSbdC7ehmrfpRftFt8Ry106qXcqv4MxKhKd5SPyHuOMUBDA

I love this picture and unknowingly took a very similar one. I already posted what I had learned about taking pictures at night with fog, and think that they will be useful for this idea. Since we can't have human subjects in this project, I would like to try this idea instead and juxtapose the eerie look that a playground has at night with how peaceful it appears during the day.

Friday, November 7, 2014

6:58 PM Posted by Eva
Inspiration

http://erickimphotography.com/blog/2011/02/28/7-bright-ways-how-to-shoot-street-photography-at-night/

There were two pictures from this blog that I really liked. The first one caught my eye because of the contrast between the light and the cyclist, as well as the framing. I like the fact that you can see a road marking because it makes it seem real and like it was taken in the moment. This is also a result of the slight tilt in the picture and that the cyclist isn't quite centered. I'm not sure what is overhead in this picture, but my eye was immediately drawn to it. 

http://erickimphotography.com/blog/wp-content/uploads/2011/02/image-in-air.jpg

The longer you look at this picture, the more you notice. At first the awning and couple under it stand out, but then your eyes drift to the stranger walking by, the silhouette of a bicycle. After a while you take in the smaller details like the windows above the shop, and the door next to it. This picture captures one moment, and the way the couple are framed makes it look like they are frozen there, just watching the world go by. The backlighting wasn't too bright, so they aren't complete silhouettes which only adds to it.

Thursday, October 30, 2014

Fog Silhouettes

7:01 PM Posted by Eva
Idea

https://encrypted-tbn3.gstatic.com/images?q=tbn:ANd9GcQCwKEimYFcdyuQggWJkvE0CEPQcKZ1R5N1trFu2679LHHIrop4


I really like the idea of taking silhouettes at night in fog. The West parking lot is like this early in the morning and late and night, and it's perfect because there are really bright spotlights that shine down, and it creates amazing shadows. At these times, you can get silhouettes of the subject as well as lots of shadows and highlights. It almost sparkles in some areas where there is a lot of light. I really would like to try this, so I looked up some techniques for taking photos in these conditions.

http://www.cambridgeincolour.com/tutorials/fog-photography.htm

According to this website, because the fog reflects some light, it makes the light meter think that it needs a shorter exposure, but in reality, it needs a longer one. It's especially important to pay attention to this considering that we will be using film cameras, so I won't be able to see how the picture comes out right away.

http://cdn.cambridgeincolour.com/images/tutorials/fog_swan-night.jpg

I love this picture because it's exactly what I want to try and do (except with a person). If I want to get a silhouette, I should set the exposure based on the fog, not the subject.

I think that these tips will come in handy when I try this technique.

Wednesday, October 22, 2014

5:30 PM Posted by Eva
Inspiration

http://pinholisticallyyours.wordpress.com/2013/06/20/self-portrait-with-brownie-pinhole-camera/


This self portrait was taken with a Brownie Pinhole Camera, and I really like how it is blurred. It looks like it was taken behind a foggy piece of glass which blurs and softens his features. This also creates some bright spots, a lot of gray's and a few black areas. This made me think about texture and focus for my self portraits. I think holding a piece of fabric with some kind of pattern over light areas could be really interesting and add some texture and contrast to my picture. Another thing to think about it focus - if I want a sharp or blurred silhouette, which part I want to be in focus, where I will stand in the frame. 

Thursday, October 16, 2014

7:00 PM Posted by Eva
Idea

http://flickrhivemind.net/Tags/450d,nissin/Interesting

I really want to utilize the studio for this project and try and experiment with lighting. In the self portrait project, I already tried silhouette pictures and some profile shots, but I really like this idea of back lighting, but actually facing the light. There is a lot of volume and texture in the subject's hair, so maybe I'll leave my hair natural and curly to try and achieve a similar look. I don't know if this would work on a white background, and setting the light will be challenging, but I would like to try it anyways. I also like how in this picture, the hair is grey, and the head is black, and a few curls are as well. The backlight also gives a faint outline of their clothes which appear to be sharp and fitted, rather than relaxed. These are all things to keep in mind while I choose how to prepare for these pictures.

Friday, October 10, 2014

9:48 PM Posted by Eva
Inspiration


http://www.thisiscolossal.com/2014/10/visible-light-alexander-harding/
I found this piece on This Is Colossal, and I really liked it. The light creates a beautiful gold tone across the picture, and I love the framing. It looks heavenly, and I used similar lighting in one of my family portrait pictures. Back lighting frames the subject and highlights some of their features while creating shadows at the same time. In my self portrait project, I really want to experiment with light, and highlighting certain features while creating shadows around others.